LostArk-ES es un fansite del juego Lost Ark de Smilegate. En este sitio creado por y para fans, encontrarás toda la información, guías, novedades y herramientas como:
Mapa Interactivo, Calculador de Habilidades y Calculador de Fallos.
Gear Traits
There are 3 Item Tiers of equipment and content. Within each Tier of equipment there are Lower, Mid, and Upper gear options, which have increasingly higher base levels and subsequently, different upgrade costs and Breakthrough Stones required for upgrade.
Pro-tip: The stat cap of combat stats on accessories does not increase with Item Tier. A T1 Artifact necklace with Critical/Agility for example can roll as much combat stats as a T3 Artifact necklace with Critical/Agility, pending the same quality. What changes is the amount of main stat and vitality that the item provides in its Basic Effects. You can use this to your advantage by creating a mobility set before moving on to the next item tier using Artifact accessories of the previous item tier. For example, my Scouter is in T3 gearing, but for traveling around I still use T2 accessories with high Agility and sometimes T2 armors that have additional tripods on them for movement skills so that they travel further or faster.
Item Quality

For weapons, quality is incredibly important on any weapon that you use that can get 15% or higher Additional Damage. This depends on rarity and where the item is within the Subtier. If the weapon can only cap out at 5%, don’t worry too much about quality. Quality on armors isn’t important, it’s just an added bonus. For accessories, quality is important in the following order:
- Necklace
- Earrings
- Rings
These items are influenced by quality in varying degrees in that order (huge stat disparity between high quality necklace and low quality necklace, low stat disparity between high quality ring and low quality ring).
You are not able to modify quality in any way. The way the item is dropped or crafted is the amount of quality that it will have forever. Quality does not carry over when succeeding, however in the case of using an upgrading scroll (currently only seen in T3 Abyss Dungeon sets) quality will carry over.
Weapons & Armor Tripods

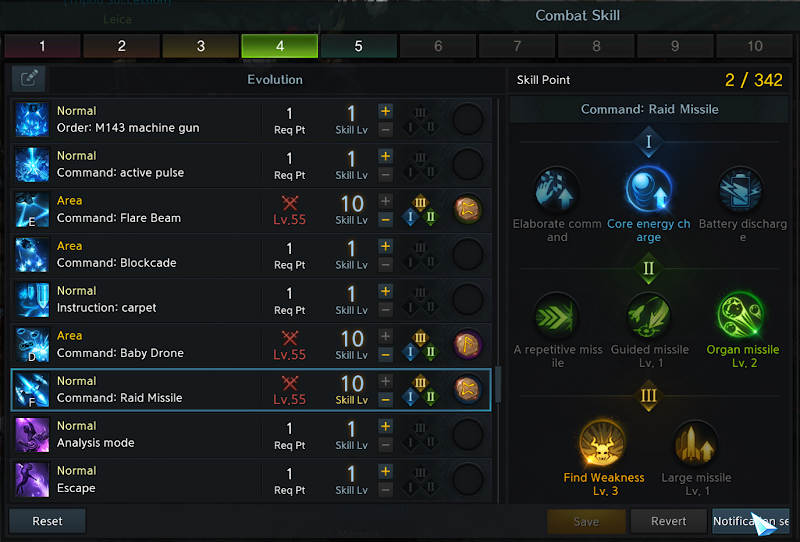
Weapons and armors additionally will have lines of tripods on them. These will boost the power of tripods on skills that are able to be leveled beyond 1. This is the only way to increase the level of these tripods. Note that duplicate tripods on armors and weapons do not stack, and only the highest will apply. You may transfer tripods between armors or weapons of the same type within the same Item Tier, regardless if it’s a Lower, Mid, or Upper Subtier. A helmet can only transfer to another helmet, etc.
The chance to succeed tripod transfer depends on the level of the tripod trait you’re trying to transfer.
- +1 Tripod: 100% Success Chance
- +2 Tripod: 30% Success Chance
- +3 Tripod: 15% Success Chance
- +4 Tripod: 5% Success Chance

These odds can be doubled by using a tripod powder which is crafted or obtained from weekly Challenge Mode in small quantities. You can only use 1 powder to double the success chance, and cannot improve the odds further than that. You are expected to fail many times for the higher level tripods because you obtain several daily attempts due to the quantity of gear dropped from Chaos Dungeons. Regardless if you fail or succeed, the item that you are trying to take the tripod from (on the right of the UI) will be destroyed.
In addition to this system, due to the fact that you may switch your main item for a new one (for example in the case of succeeding into a higher quality item or set item), it is possible to preserve all of your item’s tripods when changing to the new item.

From the same NPC, the Locker menu is able to memorize a set of tripods from an item of your choice. Each tab of the Tripod Storage Box can memorize tripods from each slot of left side equipment.
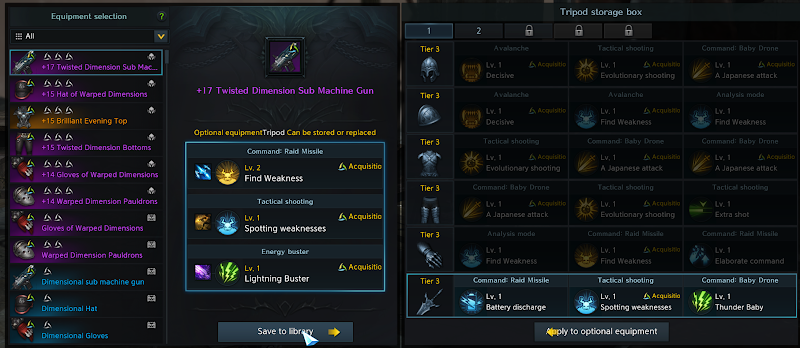
You can click Save to Library and your Tripod Storage Box will now memorize this combination of tripods, regardless if the item that you memorized them from is destroyed, succeeded, dismantled, etc. From there, you can freely use the Apply to Optional Equipment button on the right to apply the memorized tripods to the new item free of charge, provided the item is the same item slot type and within the same tier. The game will give you an error if you try to apply tripods from gear of different Item Tiers to the one you have selected.
Each page of the Tripod Storage Box can memorize a combination of tripods for each left side slot once (you can’t have it memorize 6 different weapon combinations). By default, you have 2 pages of the Tripod Storage Box.
Note that all armors and weapons can hold up to 3 tripod bonuses on the gear, regardless of if the item was found with 1 or 2 tripod bonuses initially. Before you swap tripods, consider filling out all slots of the item you intend to use first.

It is also possible for lower rarity items to have higher additive tripod bonuses on them, for example it’s plausible to transfer a +4 tripod onto a Rare item, though there’s little practical reason to ever do this. However, note that rarity impacts the max level that you can find tripod bonuses natively on items when you drop or craft them.
- Rare: +1 Tripods
- Heroic: +1-2 Tripods
- Legendary: +1-3 Tripods
- Artifact: +3-4 Tripods
Due to the potential annoyingness of this system with the high quantity of loot you can drop and having to check each and every one for ideal tripods, there is a system built in to notify you when an item drops with ideal tripods that you are seeking. You can find it from your skill menu (default button K).
From this new menu, you can select up to 48 individual tripods that can be leveled beyond 1 to notify you when you obtain any gear that has this tripod on it.
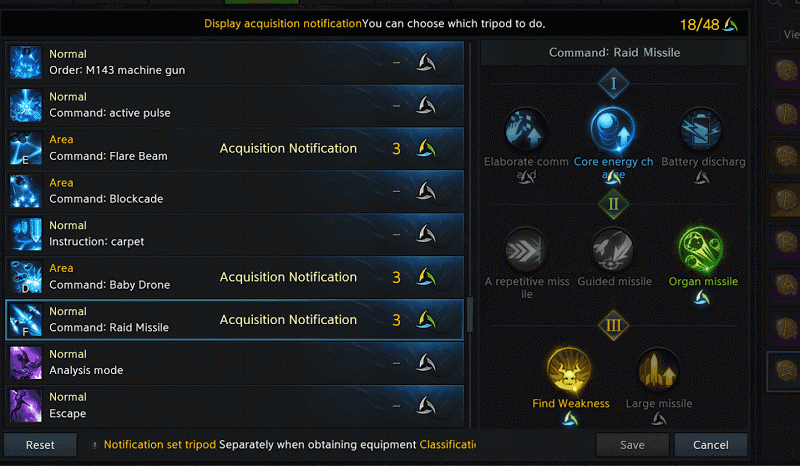
Once you Save this, any time you have an item or receive an item that has the tripods you’re looking for, you will see the special tripod symbol on the item.

Accessory Engravings
In addition to Basic Effects and combat stats, your accessories can also provide Engraving Activity to provide additional passive effects to your character.
First and foremost, there are two types of Engravings. Normal Engravings and Malus Engravings. Malus Engravings incur a passive penalty to your character. Malus Engravings include Attack Power, Attack Speed, Movement Speed, and Defense. All but Defense reduces by 2%/4%/6% at each level. Defense reduces 5%/10%/15%.
Your accessories will provide Activity of Engravings that will add up to the gauge found in the Seal tab of your Character Info.
In order to activate the bonuses of either Normal or Malus Engravings, you must accrue enough Activity of it to activate the Lv. 1, Lv. 2, or Lv. 3 effect. These are activated at 5, 10, and 15 Activity points respectively. See the Heavy Armor Engraving in the picture above. Those 6th and 7th diamonds do nothing, and it’s only a Lv. 1 Heavy Armor until I get to 10 of the diamonds.
The amount of Normal and Malus Engraving Activity points found on each accessory largely depends on the slot and the rarity.
|
Rarity |
Necklace | Earring | Ring |
Ability Stone |
|
Rare |
+1 Normal | +1 Normal | +1 Normal |
+0-6 Normal +0-6 Normal +0-6 Malus |
|
Heroic |
+1-2 Normal +1-2 Normal +1-3 Malus |
+1-2 Normal +1-2 Normal +1-3 Malus |
+1-2 Normal +1-2 Normal +1-3 Malus |
+0-8 Normal +0-8 Normal +0-8 Malus |
|
Legendary |
+2-3 Normal +2-3 Normal +1-3 Malus |
+2-3 Normal +2-3 Normal +1-3 Malus |
+2-3 Normal +2-3 Normal +1-3 Malus |
+0-9 Normal +0-9 Normal +0-9 Malus |
|
Artifact |
+3 Normal +3 Normal +1-3 Malus |
+3 Normal +3 Normal +1-3 Malus |
+3 Normal +3 Normal +1-3 Malus |
+0-10 Normal +0-10 Normal +0-10 Malus |
You can get your Class Engraving on the Necklace, Earrings, and Ring slots of your accessories. You cannot roll your Class Engraving on the Ability Stone. Also note that when dropping accessories in content such as Chaos Dungeon or Guardian Raid, you cannot get the Class Engravings of other classes, only your own.
Carefully balance out your accessories in order to maximize as many Normal Engravings as possible while avoiding Malus Engravings. Even if the penalty for a Malus Engraving seems insignificant, the equivalent amount of work needed to negate that penalty can be surprisingly high, especially if it’s the Attack Power Malus.
Note that the game UI will warn you if you have too many Activity points on a given Engraving. There is no penalty for going over 15, it’s only to let you know that you can probably trim a few Activity points in some places and perhaps optimize for another Engraving.
In addition to the Engravings found innately on your accessories, you are also able to stamp your rings with Engravings, similar to Season 1. By stamping your rings, you can gain 3, 6, 9, or 12 Activity points towards a specific Engraving, for a max of 24 Activity points from stamping Engravings on each ring.
You can earn each level of stamping by using Engraving books that come from a variety of contents. You must use 20 Engraving books in order to unlock the stamp associated with it.
| # of Activity Points | Books Needed |
| 3 Activity Points | 20 Uncommon Books |
| 6 Activity Points | 20 Rare Books |
| 9 Activity Points | 20 Heroic Books |
| 12 Activity Points | 20 Legendary Books |
All Engravings require 20 books for each stamp stage, and all Engravings now have up to 3 levels in Season 2.
Typically, content will reward Engraving books in the form of either a selection or a random pouch, or randomly give you a book in general. They will either give a selection or a random pouch for all Normal Engravings, or a selection or a random pouch for all Class Engravings. Therefore, specific Engravings no longer come from specific contents.
Once you learn a stamp, you can use it as many times as you want, and the learned stamps are shared on all characters that you have on a server. It only costs Shillings to apply the stamp.
In total, you can accrue a max of 74 Activity Points.
- 30 from Necklace, Earrings, and Rings
- 24 from stamping Engravings
- 20 from Ability Stone
Jewels

Jewels can be obtained and equipped to your necklace, earring, and ring slots starting from T2 gear and contents.
Jewels primarily come from Chaos Dungeon, but there are some other sources of them as well. Jewels are divided into types and tiers. You must equip a jewel whose tier either matches or exceeds the Item Tier of your accessory in order to yield its full bonuses. You do not get additional bonuses for equipping a higher tier jewel into a lower Item Tier accessory. However you will incur a high penalty to the bonuses of the jewel if you slot a lower tier jewel into a higher Item Tier accessory. This penalty has been observed to be about -50% to the jewel’s bonus when slotting a tier 2 jewel into an Item Tier 3 accessory.
Jewels can be leveled up to 10. They require 3 jewels of the previous level to combine, and will always succeed 100% of the time to upgrade to the next level. You will always combine jewels into a jewel for your class. You can use jewels from other classes to combine into a jewel of your class. Because of this, it is possible to send jewels from daily contents on alts to your main character so that they can improve their jewels quicker, since jewels are always unbound. When combined, it is random if you get a damage jewel or a cooldown jewel regardless of the combination of jewels that you use. You cannot change a jewel into the other type. You are able to change the skill the jewel benefits with Shilling at the appropriate NPC. The cost will go up pending the level and the jewel tier.
You can freely equip and unequip jewels from your accessories at no cost. You cannot have two jewels of the same type influence one skill. Only the higher level jewel will apply. You may have one cooldown gem and one damage jewel affect the same skill. The amount of jewel slots depends on the item slot and nothing else.
- Necklaces have 3 jewel slots.
- Earrings each have 2 jewel slots.
- Rings each have 2 jewel slots.
- Ability Stones have no jewel slots.
| Level | Jewel of Desire (Jewel Tier 2) | Jewel of Clarity (Jewel Tier 2) | Prominence Gem (Jewel Tier 3) | Annihilation Gem (Jewel Tier 3) |
|
Level 1 |
2% Cooldown Reduction | 3% Increased Damage | 2% Cooldown Reduction | 3% Increased Damage |
|
Level 2 |
4% Cooldown Reduction | 6% Increased Damage | 4% Cooldown Reduction | 6% Increased Damage |
|
Level 3 |
6% Cooldown Reduction | 9% Increased Damage | 6% Cooldown Reduction | 9% Increased Damage |
|
Level 4 |
8% Cooldown Reduction | 12% Increased Damage | 8% Cooldown Reduction | 12% Increased Damage |
|
Level 5 |
10% Cooldown Reduction | 15% Increased Damage | 10% Cooldown Reduction | 15% Increased Damage |
|
Level 6 |
12% Cooldown Reduction | 18% Increased Damage | 12% Cooldown Reduction | 18% Increased Damage |
|
Level 7 |
14% Cooldown Reduction | 21% Increased Damage | 14% Cooldown Reduction | 21% Increased Damage |
|
Level 8 |
16% Cooldown Reduction | 24% Increased Damage | 16% Cooldown Reduction | 24% Increased Damage |
|
Level 9 |
18% Cooldown Reduction | 30% Increased Damage | 18% Cooldown Reduction | 30% Increased Damage |
|
Level 10 |
20% Cooldown Reduction | 40% Increased Damage | 20% Cooldown Reduction | 40% Increased Damage |
As you can see, despite having a higher tier, tier 3 jewels don’t provide higher bonuses. Instead, they’re able to be slotted into Item Tier 3 accessories without incurring the penalty. This system forcefully encourages you to change to a new set of jewels with each new Item Tier, so you’re unable to be complacent with your existing jewels. However, do note that even with the penalty, you may still be able to utilize lower tier jewels for a few levels until you get mid-leveled jewels of the next tier. For example you’d be able to use a level 8 T2 jewel until you got a level 4 or 5 replacement T3 jewel.
Expect that if you’re at the start of a new Item Tier, you will most likely use Jewels for at least half a year minimum before the next set of Jewels are added, so they aren’t a bad investment to get stronger even if they’re temporary.
Credit by Saintone’s
This is information aggregated during my time playing Lost Ark on the Korean servers post-Season 2. As this is regional, some information may not apply to the RU, JP, or Global versions of the game. You can find gameplay of LAO Season 2 KR from my Twitch or YouTube channels. For corrections or questions you can reach me on Discord at Saintone#4599.